
Treatment plans can be viewed, modified, or created from a patient's Financial Tab
(Purple) The Financial Tab
The Financial Tab can be accessed from any screen within a patient's chart
The financial tab includes estimates, open invoices, pending invoices, and past invoices
(Blue) Create a Treatment Plan (estimate)
Select the green "+" to create a new Treatment Plan
Add a Sales Template

(Yellow) Name the Treatment Plan
In EzyVet, treatment plans require unique names
This name should be the procedure and the current date (the date you're creating the Treatment Plan)
We'll call this "COHAT 11/3/2024"
(Orange) Add a Sales Template
Sales templates will automatically generate treatment plan items based on the procedure.
First, click the "Sales Template" button
From the pop-up window, either begin typing or select the magnifying glass to search for a relevant procedure (including species and patient weight)
Modify the Treatment Plan

The Sales Template is preloaded with billing items. These should be modified before being sent to a client.
(Yellow) Change the Billing Item
Clicking this box will allow you to replace the billing item on this line
(Blue) Add or Remove Billing Item
If you over over this area, you'll see a green "+" and a red "-"
This can be used to remove or add billing lines
Removing a line this way will completely remove the item from the client's treatment plan
(Red) Modify Volume
You can click the numeric values here to modify the high or low quantities
Unchecking the box circled here will cross out billing line on the client's treatment plan
This will remove the cost of the item from the final treatment plan value
This lets the client see the item that has been removed (useful if a client declines a procedure)
(Green) Save and Send
Click "Save" to save your treatment plan
Doing so will reveal additional options:

Select "Send Email" to email the treatment plan to the client. If the client is in person, select "Create Document" to have the client sign and save the treatment plan.
Email the Treatment Plan
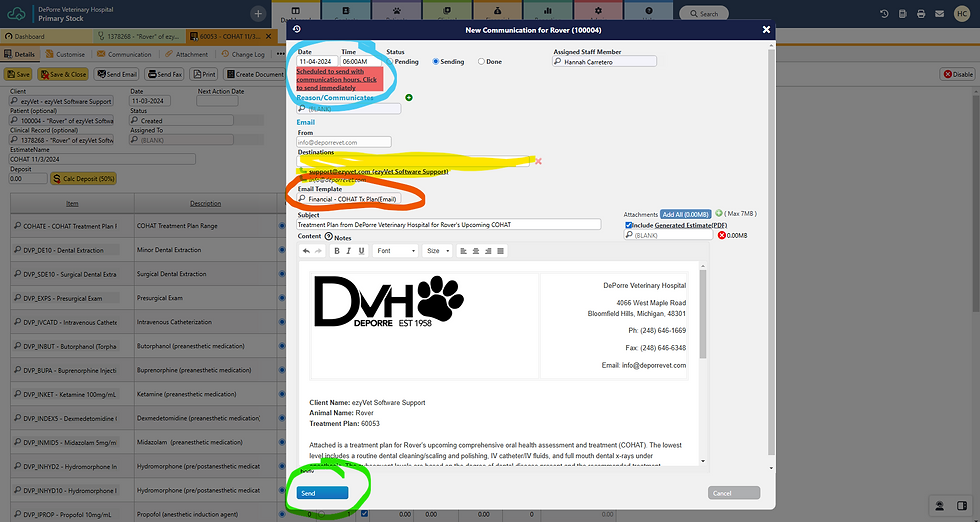
(Orange) Email Template
Begin typing or selecting the magnifying glass to select the relevant email template
(Yellow) Recipient
If a client has an email address on file, it will appear here
You can either select the email or free type a new email address
(Blue) Scheduled Delivery
Be default, client emails will only be sent once the practice has closed
If you wish to send the email immediately, you can click the box highlighted in red
(Green) Send
Click "Send" to send the Treatment plan
In-Person Signature

(Orange) Save for More
When this screen appears, select "Save" to reveal additional details along the top of the page
(Yellow) Approve and Sign
First, select "Enter Presenting Mode" to let the client review and approve the treatment plan
Next, click "In-Person Signature" to reveal a signature pop-up window
The client can either sign with the computer's mouse or with the signature pad